
Reorder items with MR.Gestures
I’m often asked how you would use drag & drop to reorder items. The simplest solution is of course with MR.Gestures. So it’s time that I finally add a page to the GestureSample which demonstrates that and explain here what I did and why.
In my case the items have various sizes. I want to react on taps and drag them around to reorder them.
The ViewModel
I wrote a simple struct for each item:
    public struct ItemViewModel
    {
        public string Text { get; }
        public Color Color { get; }

        public ItemViewModel(string text)
        {
            Text = text;
            var rnd = new Random();
            Color = Color.FromRgb(rnd.Next(0, 255), rnd.Next(0, 255), rnd.Next(0, 255));
        }
    }
Each item has a text of various lengths and a random Color just to visualize it better.
The ViewModel of the whole page then just needs a list of those items. I also added some commands so that the View can notify the ViewModel of what is going on:
    public class DragAndDropViewModel
    {
        public List<ItemViewModel> Items { get; }

        public ICommand TappedCommand { get; }
        public ICommand StartDraggingCommand { get; }
        public ICommand DroppedCommand { get; }
I initialized the Items with some Pulp Fiction quotes from slipsum.com and wrapped each word in a ItemViewModel to get some test data.
The commands will all hold Command<ItemViewModel>, so the respective item will be passed to the Execute method.
The View
The items should be displayed side by side in multiple rows. With different widths of the items the easiest to use is a FlexLayout. The FlexLayout itself does not have a ItemsSource, but this can easily be solved with Bindable Layouts. So my XAML becomes this:
    <FlexLayout x:Name="theFlexLayout"
        Wrap="Wrap" AlignItems="Start" AlignContent="Start">
        BindableLayout.ItemsSource="{Binding Items}"
        <BindableLayout.ItemTemplate>
            <DataTemplate>
                <Frame
                    BackgroundColor="{Binding Color}"
                    CornerRadius="10">
                    <Label Text="{Binding Text}" HorizontalOptions="Center" />
                </Frame>
            </DataTemplate>
        </BindableLayout.ItemTemplate>
    </FlexLayout>
Wrap, AlignItems and AlignContent simply tell the FlexLayout to display the items in multiple rows top down, left to right.
BindableLayout.ItemsSource and BindableLayout.ItemTemplate are attached properties which allow to bind to my Items from the ViewModel.
And finally within the DataTemplate we have a Frame with a BackgroundColor and the Label bound to the Text.
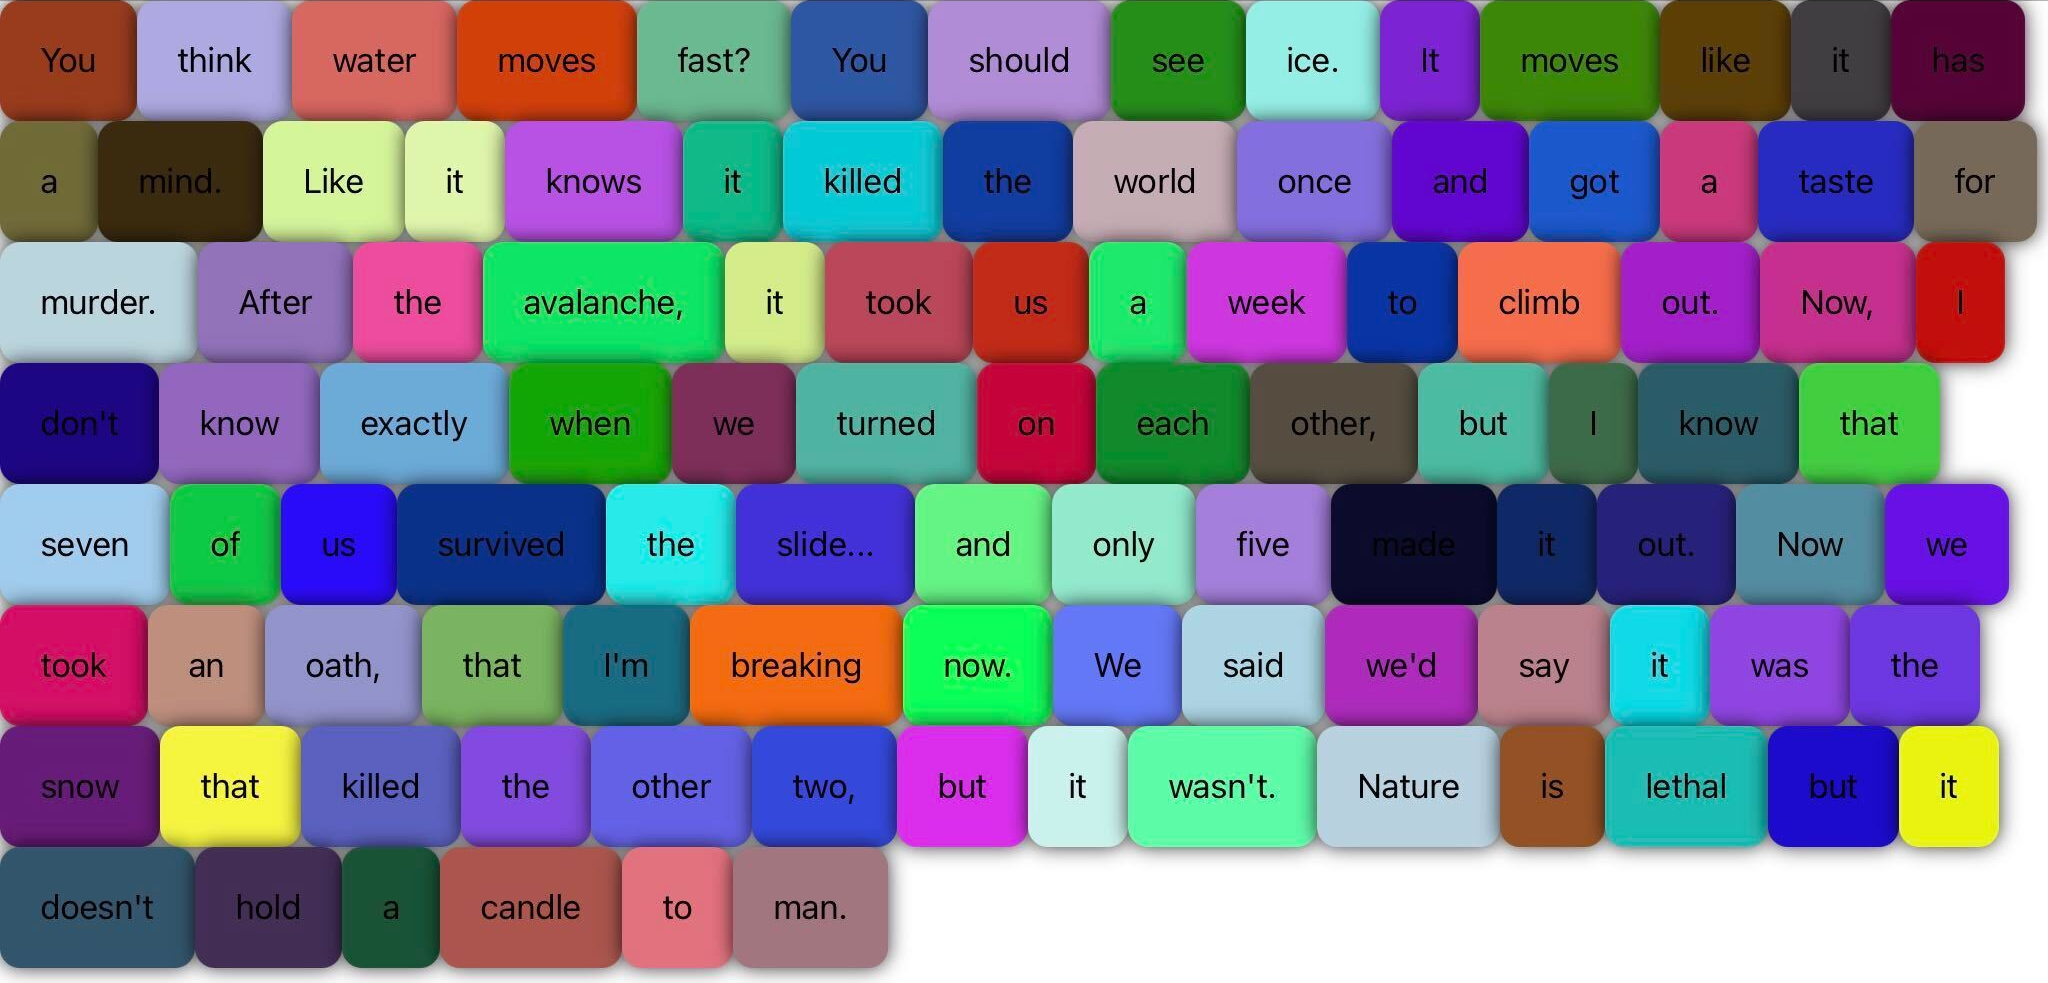
On an iPad this looks like this:
So far so good. We didn’t do any drag & drop yet.
Adjust the View for Drag & Drop
On my other test pages in the GestureSample I simply changed TranslationX/Y to move items around. But within the FlexLayout I cannot do that. The item would be displayed below other items. I need to show it above the others, so I need a surrounding Grid where I can add the draggable item to. I also need to be notified about pan gestures on that Grid so I use a MR.Gestures.Grid.
    <mr:Grid
        x:Name="theGrid"
        RowDefinitions="3*,*"
        Panning="Grid_Panning"
        Panned="Grid_Panned">

        <FlexLayout ...
The ViewModel doesn’t need to know about the drag&drop stuff. This is just View related and the VM will only be notified when dragging starts and an item is dropped. All the code for drag&drop is in the code behind of the View. So I use events in this case. The Grid_Panning method handles dragging and Grid_Panned dropping of an item.
The Xamarin.Forms.DragGestureRecognizer uses a long press to start a drag gesture. With MR.Gestures you have the option. I want to start it as soon as the user drags something. To get the touched item it is easiest to use the Down gesture.
I also want to be notified, when an item is tapped. And to be exact: the ViewModel needs to be notified because this tapping is not related to the drag&drop gesture, it triggers something in my business logic.
I replace the Xamarin.Forms.Frame with a MR.Gestures.Frame and add some gesture handlers:
    <DataTemplate>
        <mr:Frame
            TappedCommand="{Binding Source={RelativeSource AncestorType={x:Type ContentPage}}, Path=BindingContext.TappedCommand}"
            TappedCommandParameter="{Binding}"
            Down="Frame_Down"
            ...
Remember: for each item within the DataTemplate the BindingContext is a ItemViewModel. But the TappedCommand is a property in DragAndDropViewModel. Therefore I have to search for the surrounding ContentPage up the visual tree and use its BindingContext.TappedCommand. This is a bit tricky, because you don’t get a warning or binding error when something is wrong. I forgot the TappedCommandParameter and then the command was never executed because the type of the parameter was wrong. I searched for hours for the correct syntax of RelativeSource when in fact the problem was the missing parameter binding.
The Down parameter is easier. It’s just the name of a method in the Views code behind.
The code behind
Lets begin with that method:
    Frame draggingObject;

    private void Frame_Down(object sender, MR.Gestures.DownUpEventArgs e)
    {
        // remember draggingObject
        draggingObject = (Frame)sender;
    }
It just remembers which Frame (=item) has been touched and that’s it. I could also get that from the touch coordinates in the Grid_Panning handler, but this way you could easily replace it with e.g. LongPressing if you want to start dragging with a long press.
In Grid_Panning we first have to check, if the gesture just started.
    bool dragging = false;
    AbsoluteLayout cloneContainer;
    Frame clone;
    double x, y, w, h;
    int originalIndex, currentIndex;

    private void Grid_Panning(object sender, MR.Gestures.PanEventArgs e)
    {
        if(!dragging && draggingObject != null)
        {
Initialize dragging
Tell the ViewModel that the dragging gesture starts.
VM.StartDraggingCommand.Execute(draggingObject.BindingContext);
Now we start the dragging operation and initialize everything.
dragging is a flag so that the View knows, that something is dragged. We could probably also do this with draggingObject, but it’s simpler like this.
dragging = true;
originalIndex is the index of the draggingObject when the gesture started, currentIndex is the index over which the touch is at any given time.
originalIndex = currentIndex = theFlexLayout.Children.IndexOf(draggingObject);
Find the related ItemViewModel.
var draggingItem = (DragAndDropViewModel.ItemViewModel)draggingObject.BindingContext;
Now we create a clone of the draggingObject. This is the object, which we will move around the screen.
            clone = new Frame()
            {
                BackgroundColor = draggingItem.Color,
                CornerRadius = draggingObject.CornerRadius,
                BorderColor = Color.Red,

                Content = new Label()
                {
                    Text = draggingItem.Text,
                    HorizontalOptions= LayoutOptions.Center,
                }
            };
Get position and size of the object. GetAbsolutePosition is a helper method which just adds up X and Y of the draggingObject and its parents.
            (x, y) = GetAbsolutePosition(draggingObject);
            w = draggingObject.Width;
            h = draggingObject.Height;
Add clone to the page at the same position as the draggingObject but on top of all other objects. For that we add an AbsoluteLayout to the same Grid.Row/Column (0/0) as the FlexLayout. The position of the clone within the AbsoluteLayout is the same position as the original draggingObject.
            cloneContainer = new AbsoluteLayout();
            cloneContainer.Children.Add(clone, new Rectangle(x, y, w, h));
            theGrid.Children.Add(cloneContainer);
Make the draggingObject invisible. If I set IsVisible to false, then the FlexLayout removes the child. But I want a gap where the item would be inserted so that the user can easily see where it will go. So I leave it visible, but make it transparent.
            draggingObject.Opacity = 0;
        }
Drag
The dragging gesture is started and the clone is in place. Now we are in the loop which will be executed every time, the finger moves on screen.
        if (dragging && draggingObject != null)
        {
Change the coordinates of the clone. Here I use PanEventArgs.DeltaDistance to see, how much the touch moved since the last Panning event.
            x += e.DeltaDistance.X;
            y += e.DeltaDistance.Y;
            AbsoluteLayout.SetLayoutBounds(clone, new Rectangle(x, y, w, h));
Check if the child under the touch coordinates changed. Here again I need MR.Gestures to get the coordinate of the first finger on the screen. GetChildAt is a helper method which I will not list here. You’ll find it in the full source code.
            var newIndex = GetChildAt(e.Touches[0]);
            if (newIndex == -1)
                newIndex = originalIndex;

            if(newIndex != currentIndex)
            {
If the touch moved to a different item, then we remove the draggingObject from the old position and insert it at the new one. Remember that the draggingObject is transparent. So we actually only move the gap around at which the item would be dropped.
                theFlexLayout.Children.RemoveAt(currentIndex);
                theFlexLayout.Children.Insert(newIndex, draggingObject);
We then change the currentIndex to the newIndex. A small detail which must not be forgotten.
                currentIndex = newIndex;
            }
        }
    }
Drop
When the finger is lifted from the display, the Panned gesture is raised.
    private void Grid_Panned(object sender, MR.Gestures.PanEventArgs e)
    {
        if (dragging && draggingObject != null)
        {
Remove the clone and cloneContainer from the page.
theGrid.Children.Remove(cloneContainer);
Make draggingObject visible again. It is already at the correct position.
draggingObject.Opacity = 1;
Change the order of the Items in ViewModel.
            var draggingItem = VM.Items[originalIndex];
            VM.Items.RemoveAt(originalIndex);
            VM.Items.Insert(currentIndex, draggingItem);
Tell VM that the order changed
            VM.DroppedCommand.Execute(draggingObject.BindingContext);
        }
Reset my temporary variables.
        dragging = false;
        draggingObject = null;
        clone = null;
        cloneContainer = null;
    }
This solution does not need any native code. It works out of the box on iOS, Android and UWP. I didn’t test the other platforms, but they should work too.
I added the code to the GestureSample. So the easiest way to browse it is to check that out. When you run the sample, the test page can be found in Tests / Drag&Drop Items in FlexLayout.
The code used for this sample is in
ViewModels/Tests/DragAndDropViewModel.cs
Views/Tests/DragAndDropPage.xaml
Views/Tests/DragAndDropPage.xaml.cs